
If you want to sell print-on-demand products through WooCommerce, the first step is connecting your WooCommerce store to teelaunch. In this post we will show you How to Connect teelaunch to WooCommerce. A no fuss guide.
Once your store is connected, you can create products in teelaunch and send them directly to WooCommerce, where customers can view and buy them through your online store.
In this guide, we’ll walk through how to connect teelaunch to WooCommerce step by step, from adding your store in Launchpad to installing the teelaunch plugin in WordPress.
This guide is ideal for beginners, creators, side hustlers and small business owners who want to start selling custom products without holding stock.
Note: WooCommerce, WordPress and teelaunch may update their layouts from time to time, so the exact screens may look slightly different. However, the overall process should be similar.
Before connecting teelaunch to WooCommerce, you’ll need:
- A WooCommerce store
- Access to your WordPress admin
- Access to your teelaunch account
- Your WooCommerce store URL
- Permission to install plugins on your WordPress site
You do not need to have a full product range ready. If you are just getting started, connecting your store first is enough.
Step 1: Log in to your accounts
Start by logging in to your teelaunch account and your WordPress account.
You will need access to both during the setup process, so it helps to have them open before you begin.
Step 2: Add your WooCommerce store in Launchpad
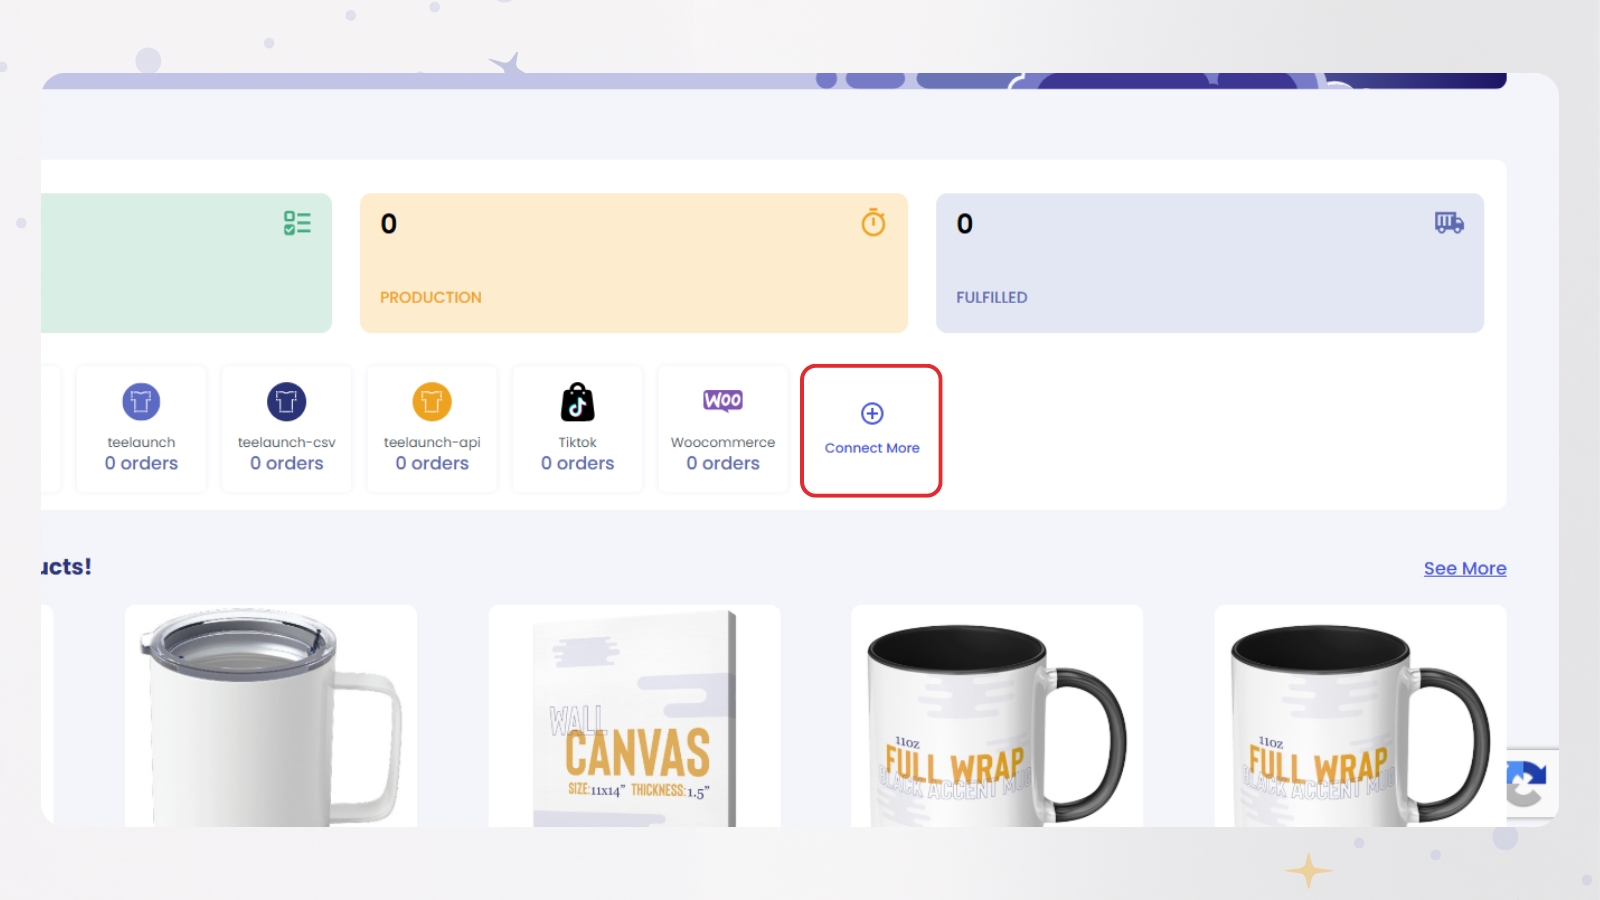
From Launchpad, locate the store icons and select Connect more.
This is where you can add a new store connection to your teelaunch account.
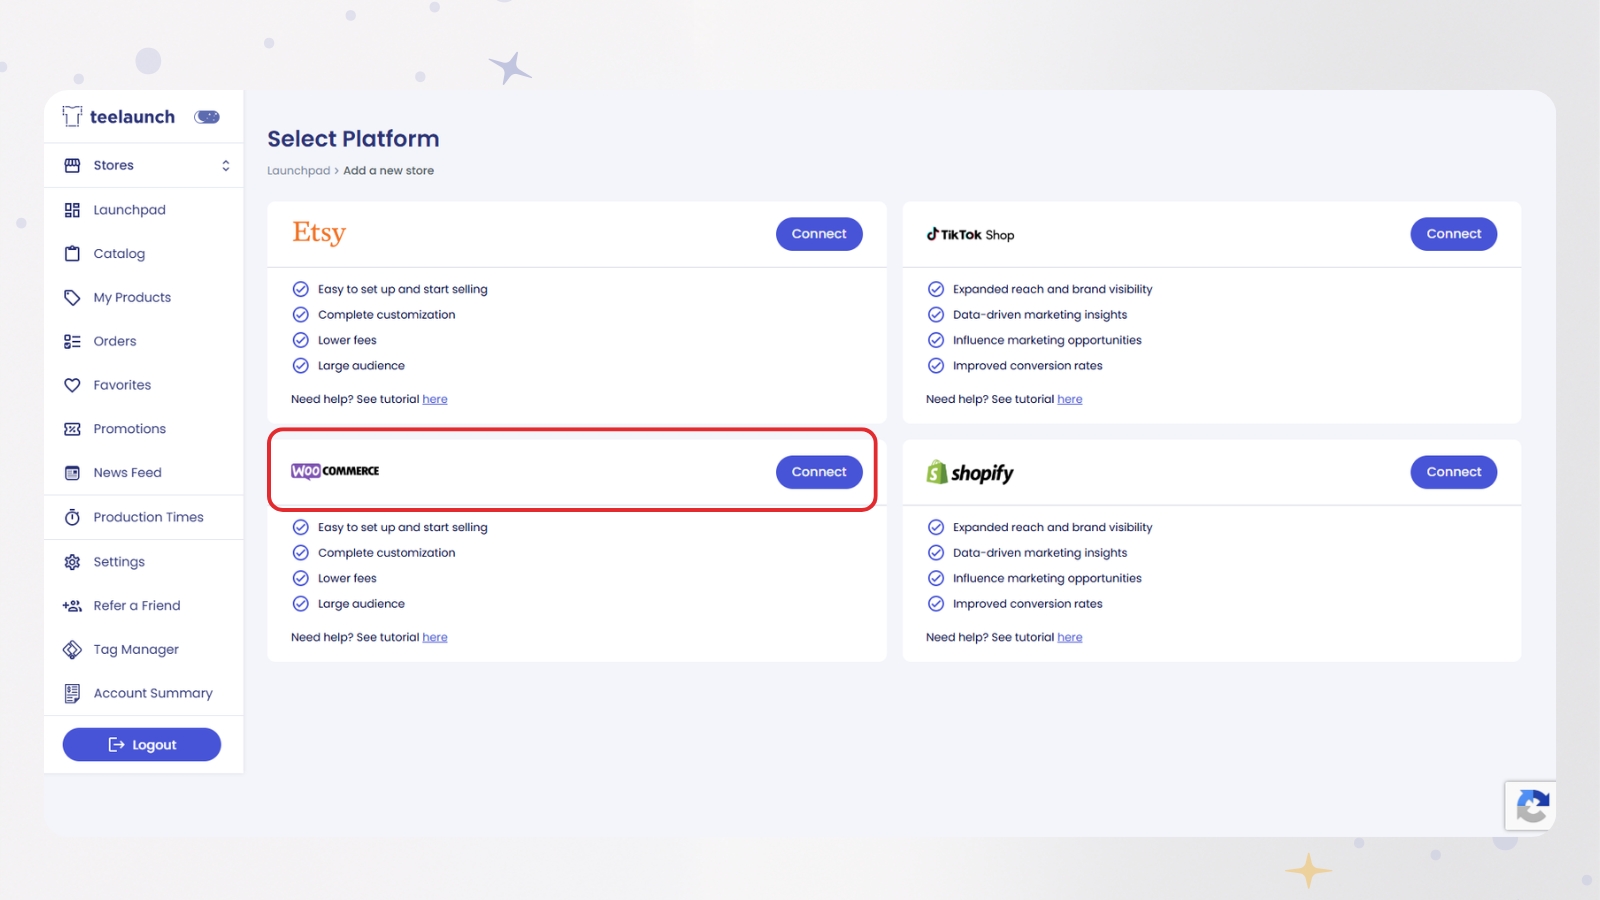
Choose Connect WooCommerce to begin the setup.
Step 3: Add your WooCommerce store URL
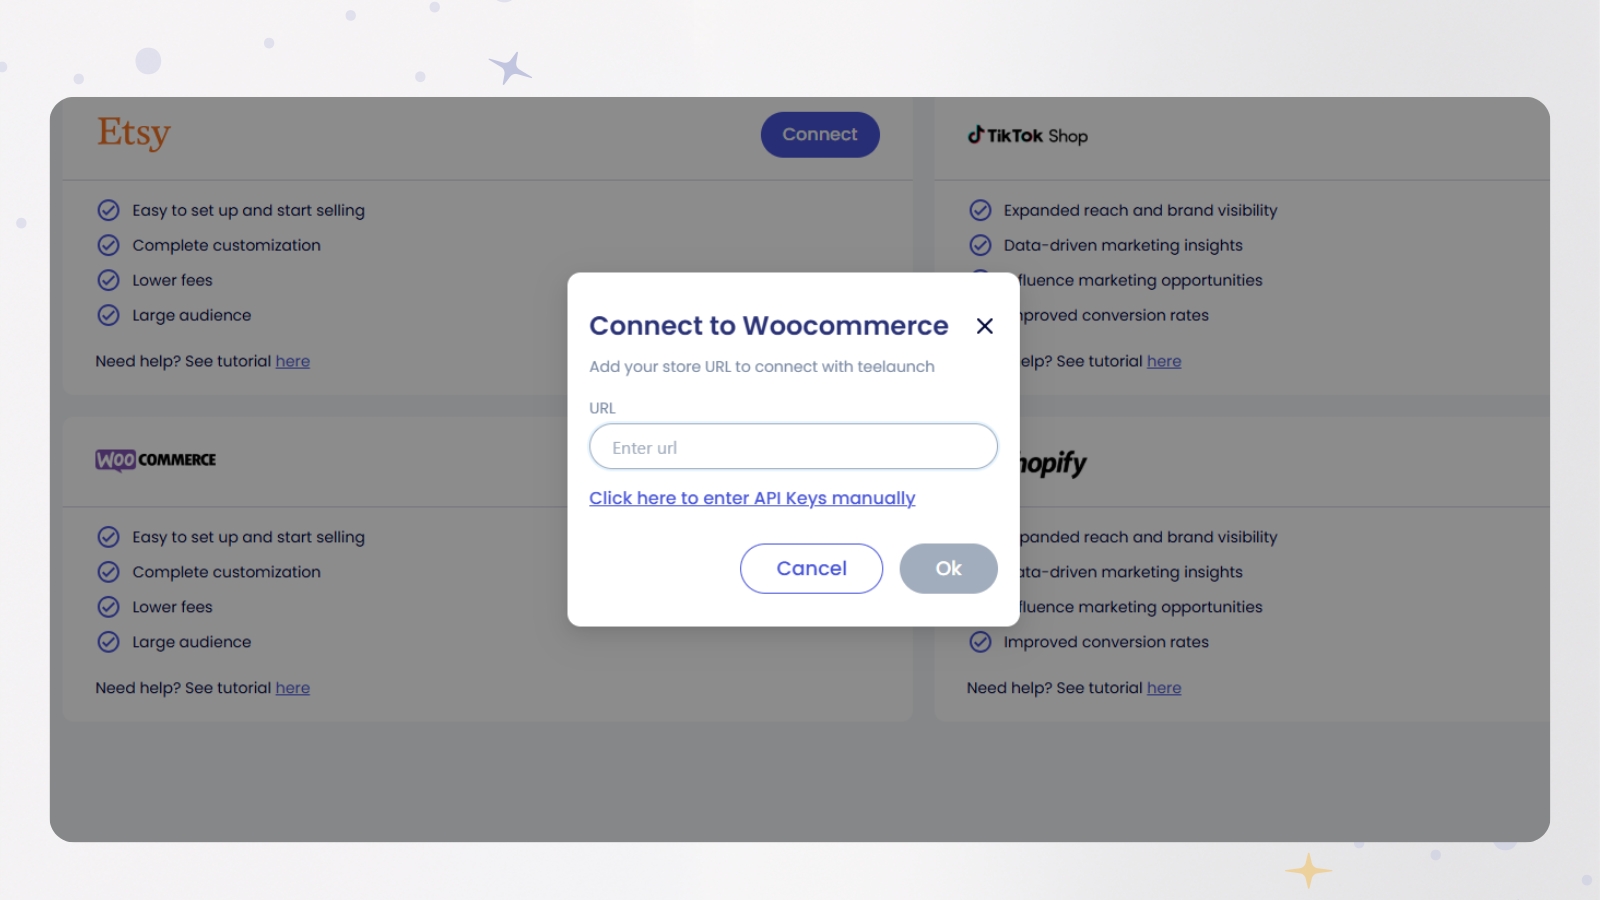
After selecting WooCommerce, you will be prompted to enter your store URL.
Add your WooCommerce store URL and continue.
This tells teelaunch which WooCommerce store you want to connect.
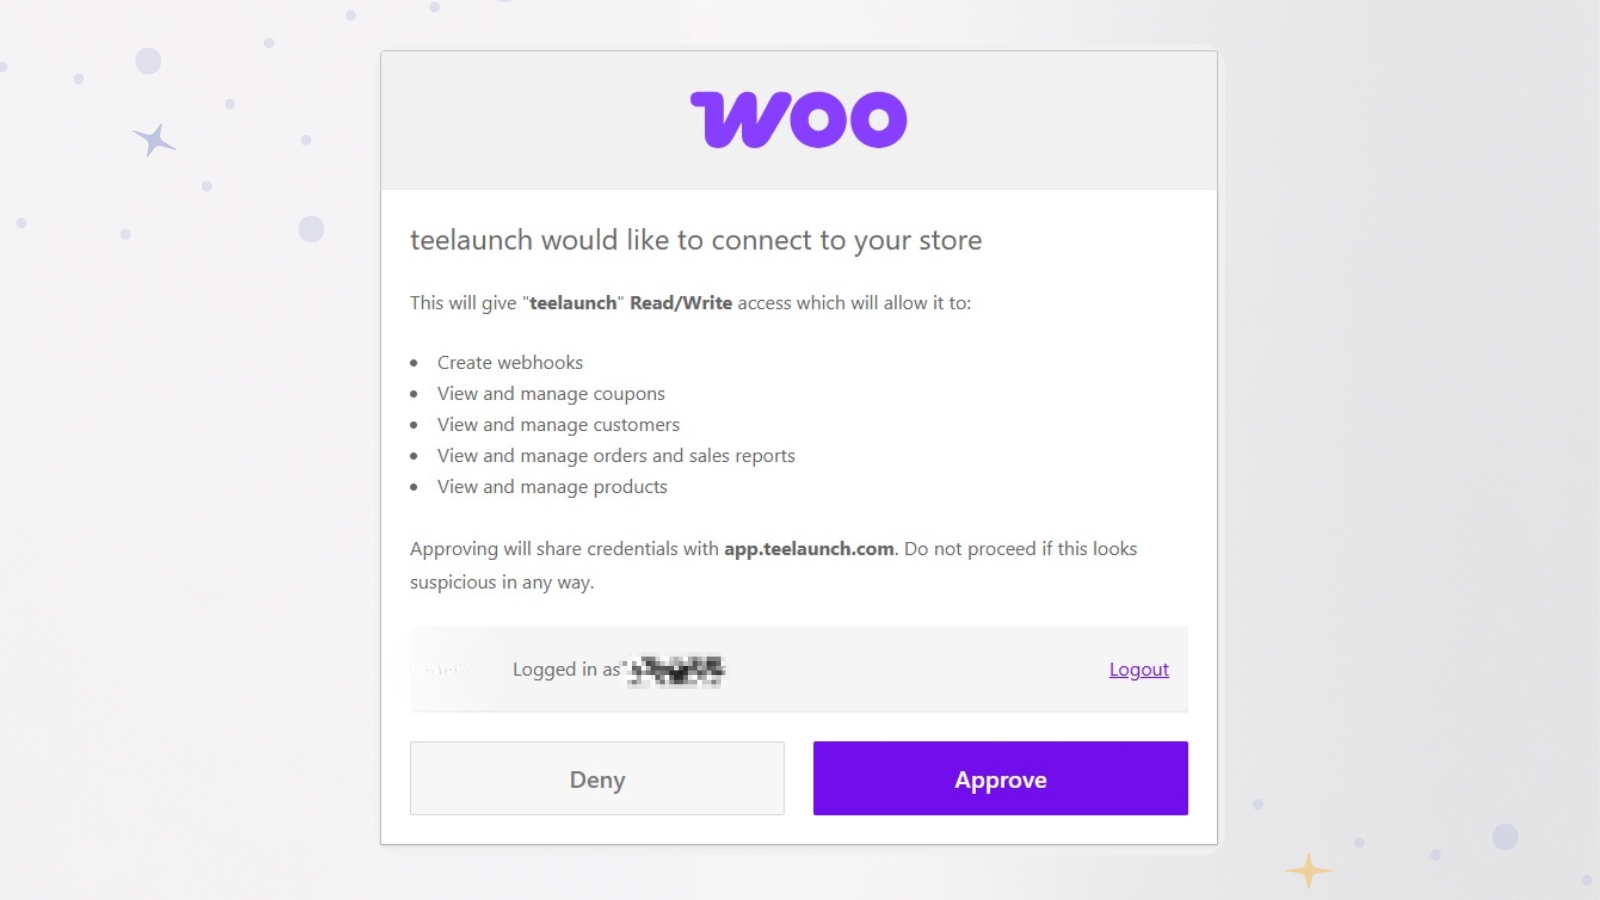
Step 4: Approve read/write access
WooCommerce will ask you to approve access for teelaunch.
You will need to allow read/write access so teelaunch can connect with your store.
This permission allows teelaunch to send products to WooCommerce and help manage the connection between both platforms.
Review the request, then approve access to continue.
Step 5: Download the teelaunch plugin
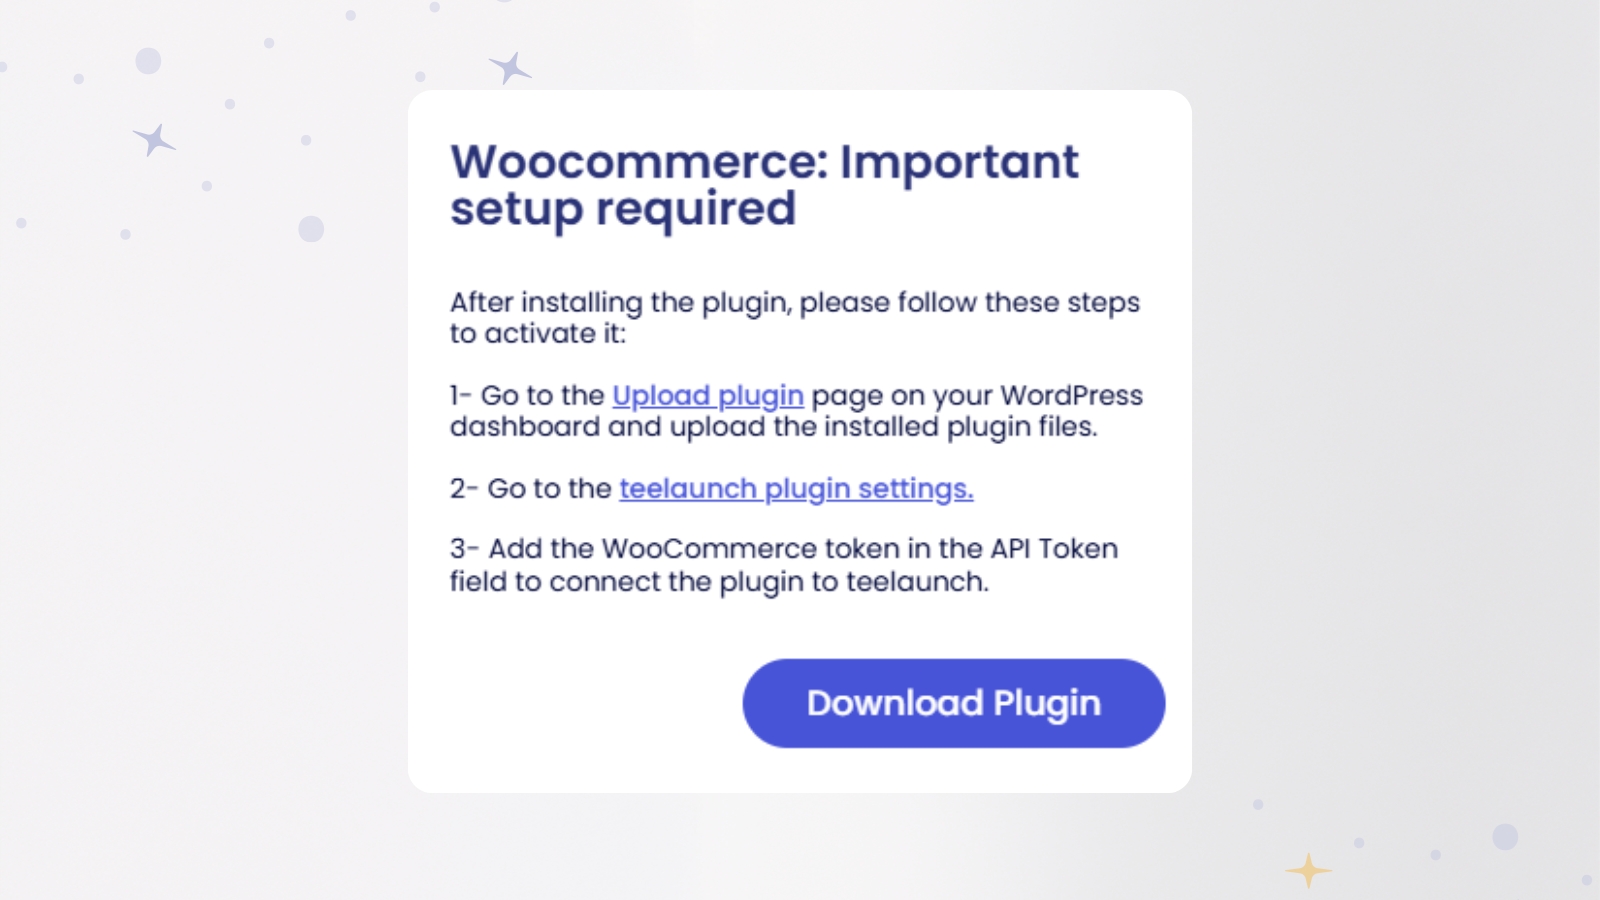
Next, an important step will appear asking you to download a plugin for your WordPress site.
Select Download plugin.
This download may take a few minutes. Once the plugin has downloaded, keep the file as a .zip folder. You do not need to unzip it.
Step 6: Go to Plugins in WordPress
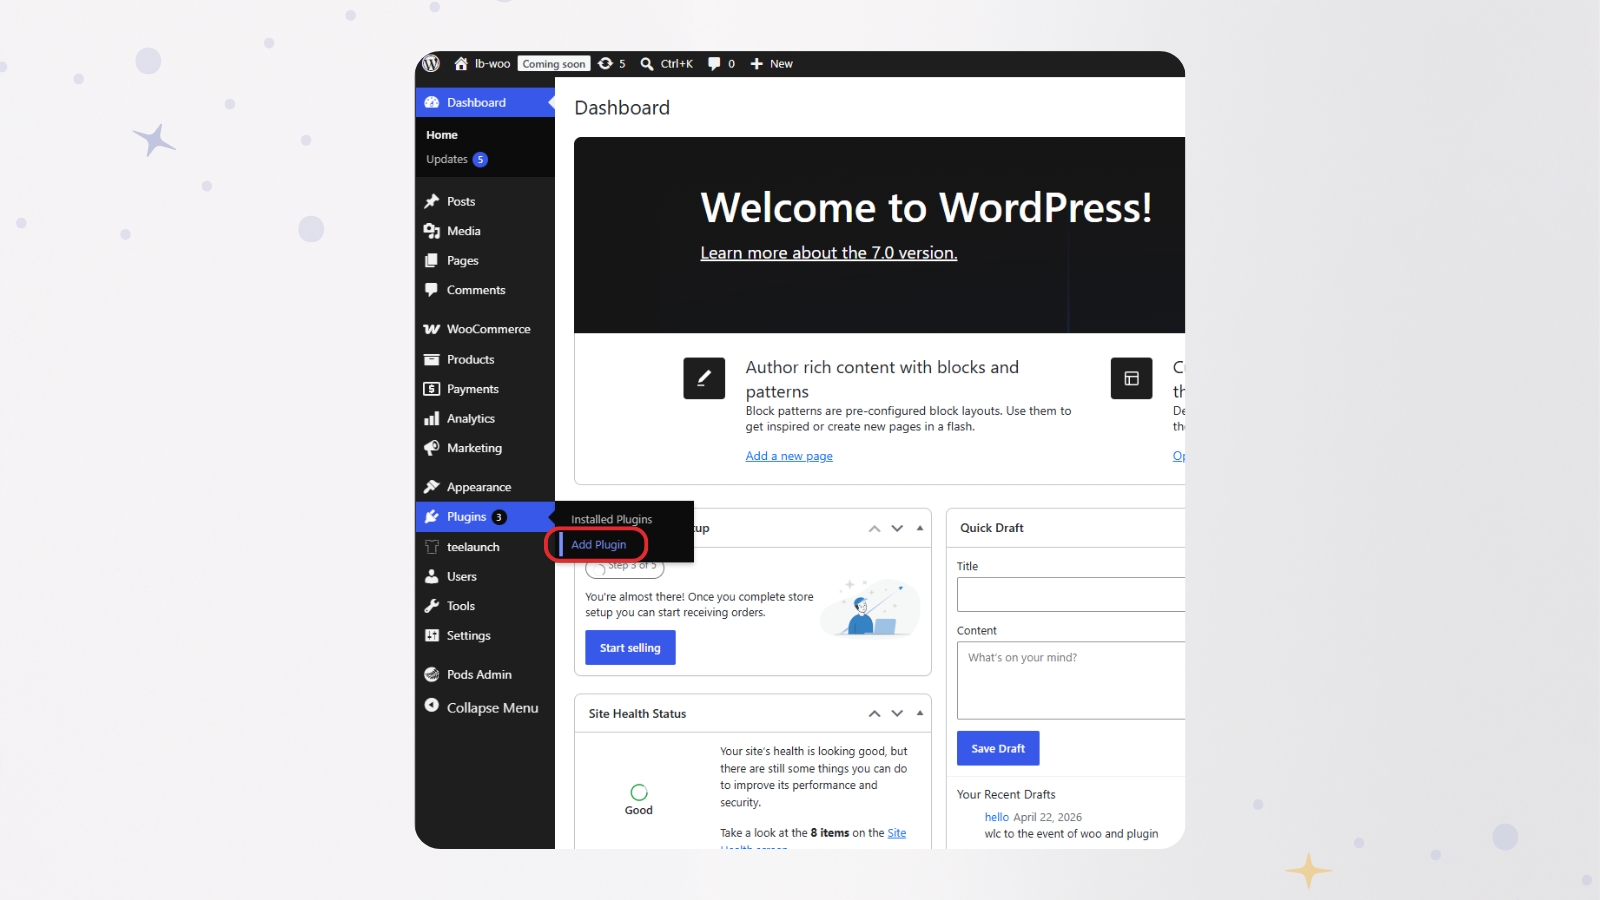
Now head over to your WordPress admin.
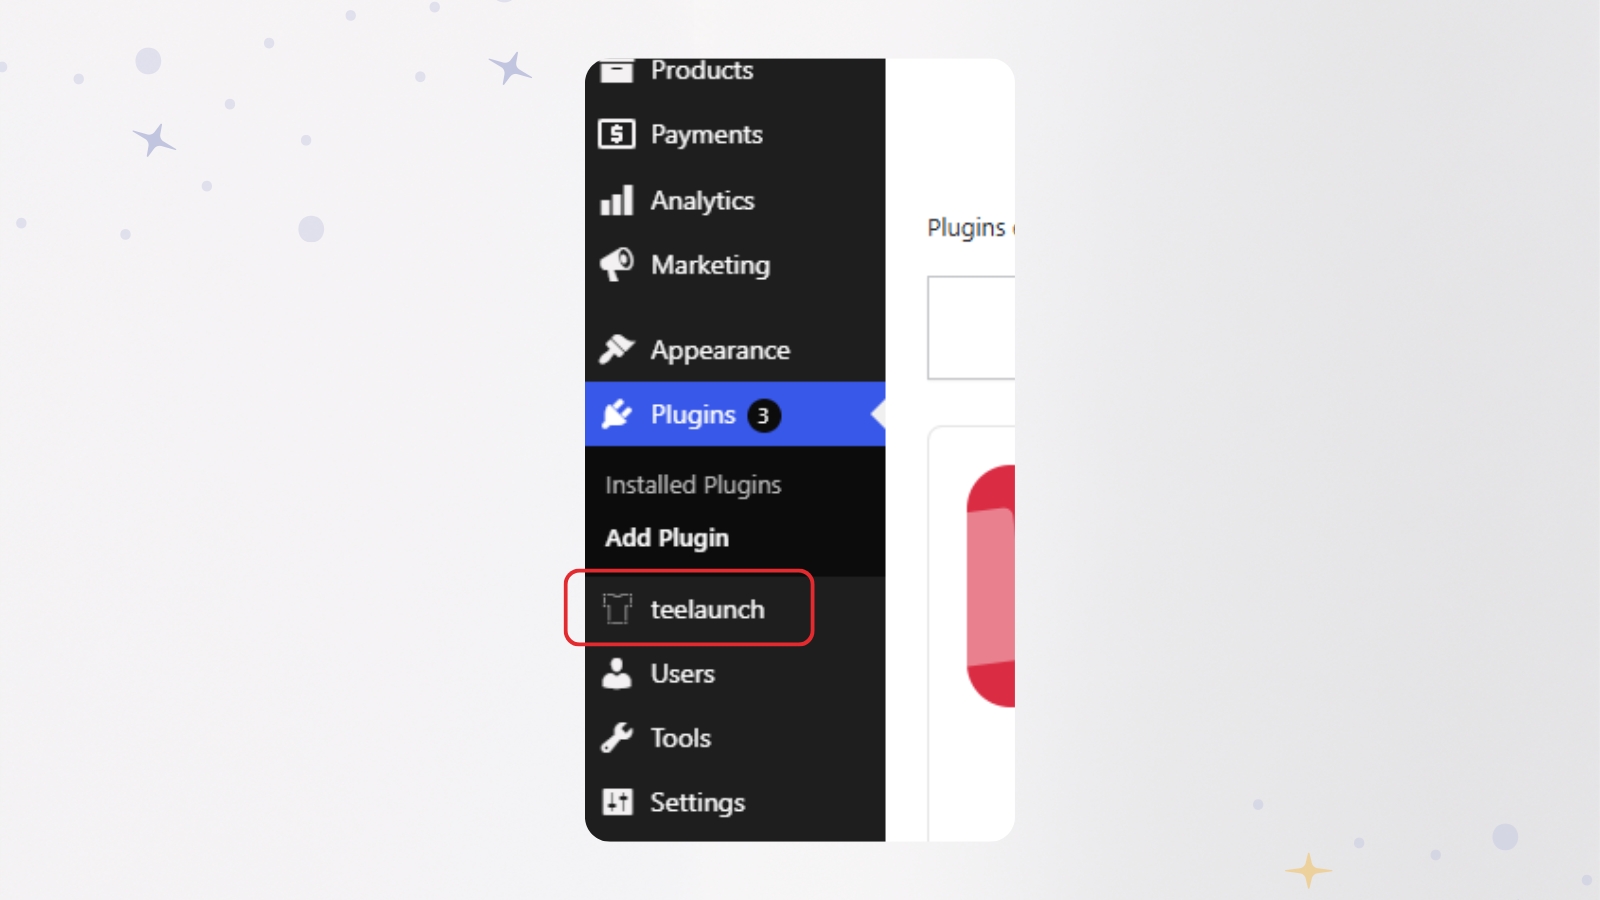
In the sidebar, locate Plugins, then select Add Plugin.
This is where you can upload and install the teelaunch plugin you just downloaded.
Step 7: Upload the plugin
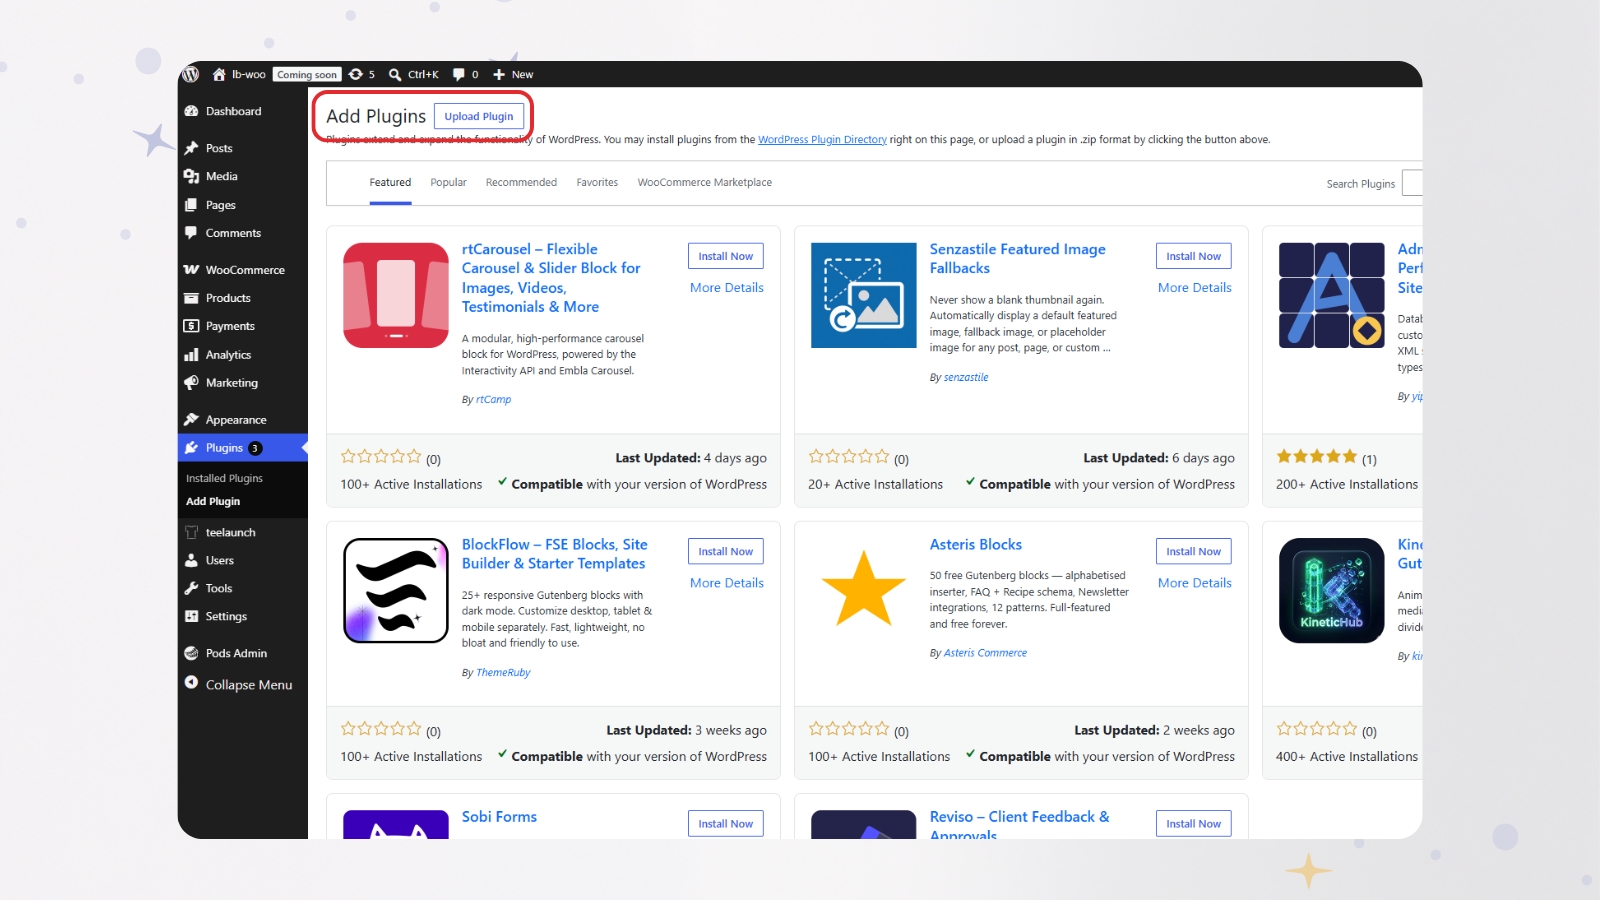
At the top of the plugin section, select Upload Plugin.
Find the .zip folder you downloaded from teelaunch, then select Install Now.
You do not need to unzip the folder before uploading it.
Once the plugin has installed, follow the prompts to activate it.
Step 8: Open teelaunch in your WordPress sidebar
After the plugin is installed, you should see teelaunch appear in your WordPress sidebar.
Open the teelaunch plugin area, but do not add anything yet.
Before completing the plugin setup, you need to generate an API token from your teelaunch account.
Step 9: Generate your WooCommerce API token in teelaunch
Head back to the teelaunch app.
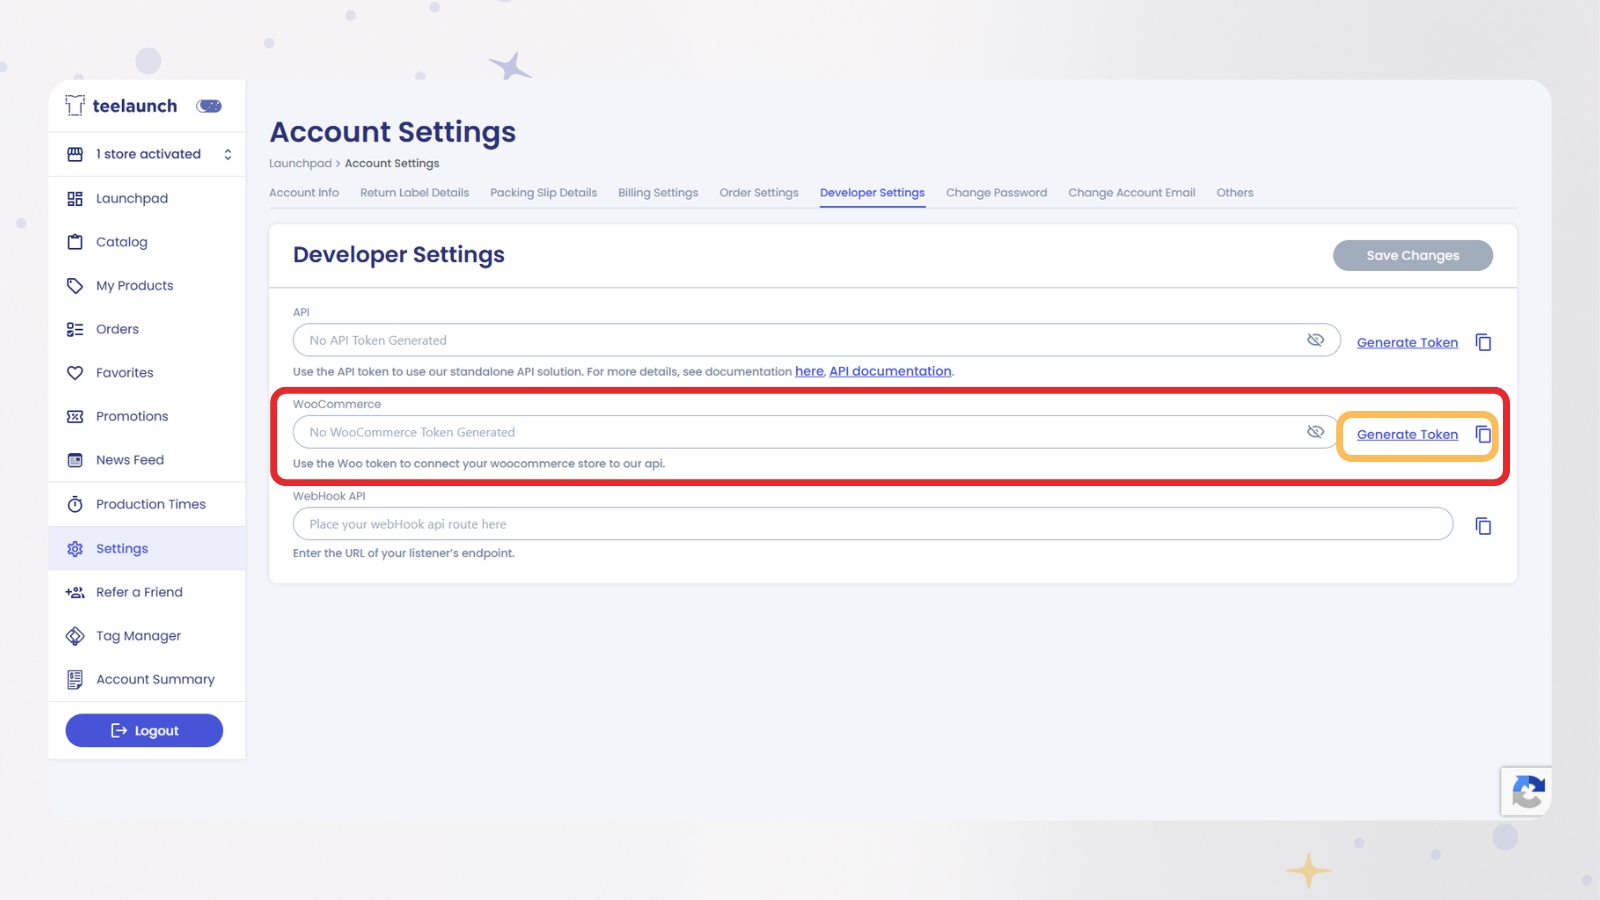
Go to Settings, then open Developer Settings.
From here, generate an API token for WooCommerce.
Once the token has been created, copy it. You will need to paste this into WordPress in the next step.
Step 10: Add the API token to WordPress
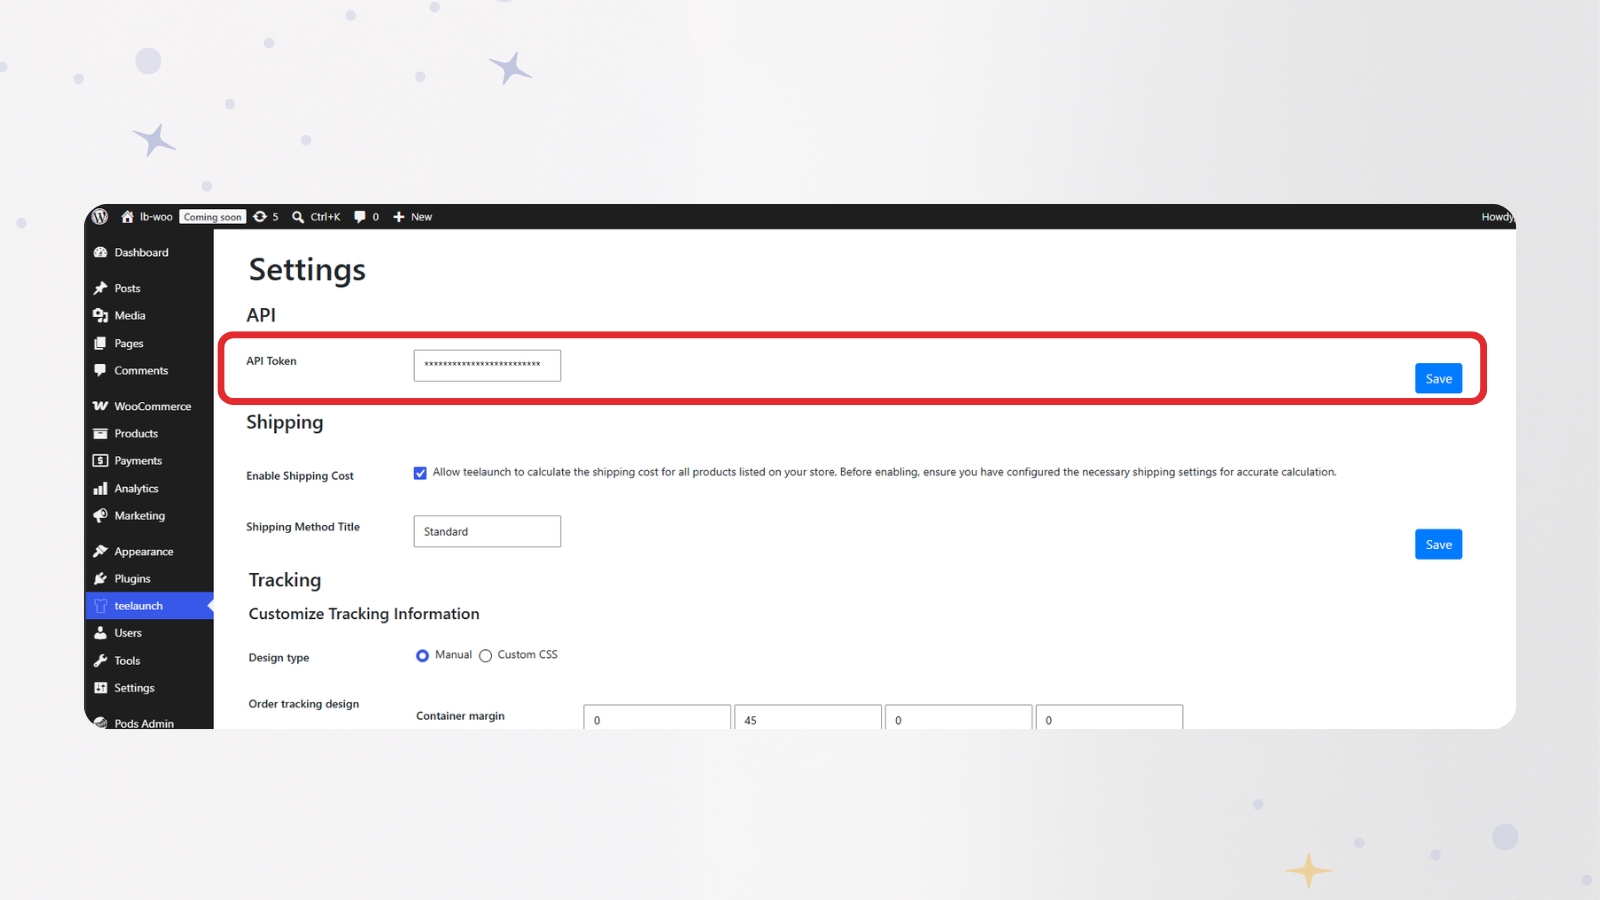
Now return to WordPress and open the teelaunch plugin from your sidebar.
You should see an API token setting inside the plugin.
Paste your WooCommerce API token into this field, then select Save.
This connects the teelaunch plugin in WordPress with your teelaunch account.
Step 11: Check your WooCommerce store is active in teelaunch
Once the API token has been saved, head back to teelaunch.
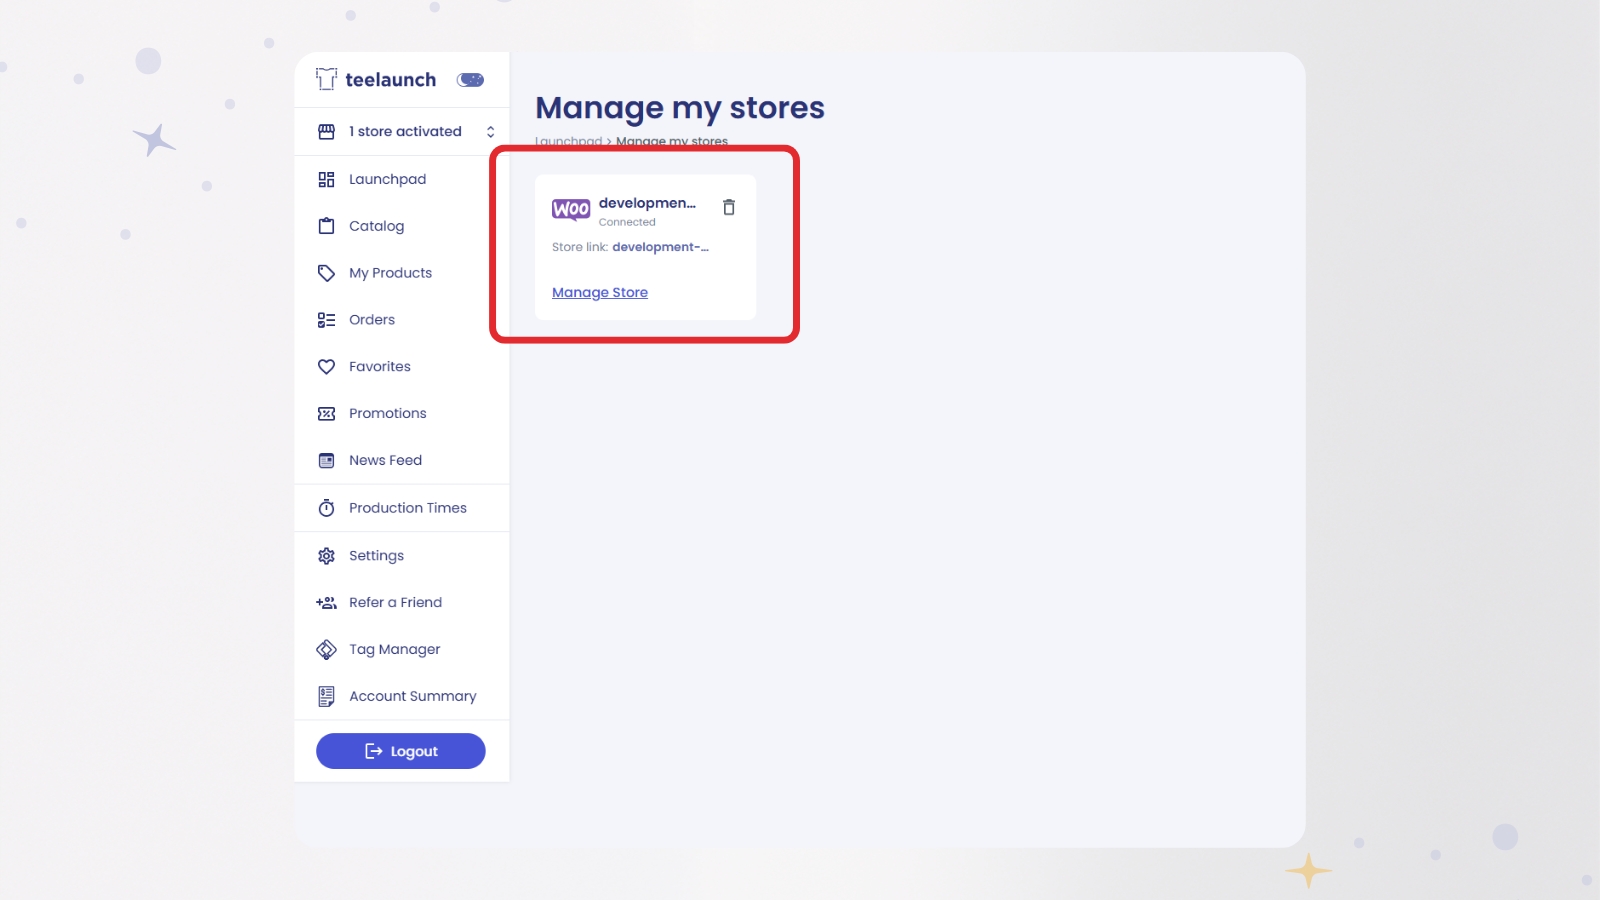
Your WooCommerce store should now appear as active.
To double-check the connection, go to Manage My Stores inside teelaunch.
If your WooCommerce store is listed and active, your connection is complete.
What happens after you connect teelaunch to WooCommerce?
Once teelaunch and WooCommerce are connected, you can use teelaunch as your print-on-demand supplier for products in your WooCommerce store.
The basic process is:
- Create your product in teelaunch.
- Send the product to WooCommerce.
- Customers buy the product through your WooCommerce store.
- The order is produced and fulfilled through teelaunch.
This means you do not need to hold stock or manage printing yourself. You can focus on creating products, building your store and promoting your brand.
Common questions connecting shops and plugins to WordPress.
Do I need to install a plugin?
Yes. To connect teelaunch to WooCommerce, you will need to download the teelaunch plugin and upload it to your WordPress site.
Do I need to unzip the plugin file before uploading to WordPress?
No. Keep the plugin as a .zip folder and upload it directly through the WordPress plugin area.
Why do I need an API token?
The API token connects your WordPress plugin with your teelaunch account. This allows the two platforms to communicate with each other.
Can I send products from teelaunch to WooCommerce?
Yes. Once your WooCommerce store is connected and active, you can create products in teelaunch and send them to your WooCommerce store.
Ready to connect teelaunch to WooCommerce?
Connecting teelaunch to WooCommerce is the first step towards selling print-on-demand products through your own WordPress store.
Start by adding your WooCommerce store in Launchpad, approve the connection, download and install the teelaunch plugin, then generate and save your API token.
Once your store is active, you can start creating products and building your print-on-demand range one item at a time.

From Thomas, teelaunch’s Chief Vision Officer